


Products are the basis of your business, the goods or services that you trade in. Each product must be registered in Microsoft Dynamics NAV as an item card.
 Note Note |
|---|
| In Microsoft Dynamics NAV, a product is referred to using the term “item”. |
Item cards hold the information that is required to buy, sell, store, and deliver products. The item card can be of type Inventory or Service to specify if the product is physical. Apart from some fields that relate to the physical aspects of an item, all fields on an item card function in the same way for inventory items and services. For more information about selling an item, see How to: Invoice a Sale.
If item templates exist for different item types, then a window appears automatically when you create a new item card from where you can select an appropriate item template. If only one item template exists, then new item cards always use that template.
The item description is not saved and reused on templates.
| Note |
|---|
| For this procedure, there is information about how to manually fill in all the fields on an item card, as if no item template exists. However, steps 2 through 5 and steps 15 through 19 describe how to use the Item Template window. |
To fill a new item card
On the Role Center, choose Items to open the list of existing items.
On the Home tab, in the New group, choose New.
If only one item template exists, then a new item card opens with fields filled with information from the template. Only the Description field is empty.
If more than one item template exists, then a window with available item templates automatically opens. In that case, follow the next step.
Select an item template, and then choose the OK button. A new item card opens with fields filled with information from the template. Only the Description field is empty. You can edit all fields.
If you want to create a new item card, without using a template, follow the next step.
In the list of item template, choose the Blank Item Card template. An empty item card opens.
Follow steps 6 through 14 to fill fields on the item card manually.
In the Description field, enter the name of the item.
Choose the Base Unit of Measure field, and then select a unit, for example, PCS if the item is an inventory item. This field is required.
Select the Automatic Ext. Text check box to always insert the item’s extended description on document lines.
Fill in the fields in the Financial Details group as described in the following table.
Field Description Gen. Prod. Posting Group
Specify the item’s trade type to link transactions made for this item with the appropriate general ledger account according to the general posting setup.
The combination of the general product posting group that is assigned to your items and the general business posting group that is assigned to your customers determines which general ledger accounts the sales invoice entries are posted to.
This field is required.
Tax Prod. Posting Group
Specify the item’s Tax specification to link transactions made for this item with the appropriate general ledger account according to the Tax posting setup.
This field is required.
Inventory Posting Group
Specify the item’s inventory type to link business transactions made for the item with the appropriate inventory account in the general ledger according to the inventory posting setup.
This field is required.
Fill in the fields in the Cost group as described in the following table.
Field Description Costing Method
Specify how the item’s cost flow is recorded and whether an actual or budgeted value is capitalized and used in the cost calculation.
The field is set to FIFO and cannot be changed.
Unit Cost
Enter your initial purchase price for the item. After your first sale, the value will be updated according to automatic cost adjustment to contain the most recent average unit cost.
Indirect Cost %
Specify the percentage of the item's direct unit cost that includes indirect costs, such as freight associated with the purchase of the item.
Last Purchase Cost
Specify the most recent unadjusted unit cost of the item.
The field is updated with the direct unit cost as invoiced by your vendor in the last posted purchase invoice line for the item.
Fill in the fields in the Price group as described in the following table.
Field Description Profit %
Specify the profit margin that you want to sell the item at.
The value that you enter may be modified according to your selection in the Price/Profit Calculation field.
Unit Price
Specify the price that you want to sell the item at.
The value that you enter may be modified according to your selection in the Price/Profit Calculation field.
In addition to the unit price that you specify on the item card, you can set up different unit prices that are automatically granted to a customer on a sales document when certain criteria are met. For more information, see How to: Create Sales Prices for a Customer.
Price/Profit Calculation
Specify if the profit percentage or unit price are calculated, or if neither calculation is performed. The following options exist.
- Profit=Price-Cost: The value in the Profit % field is calculated as follows:

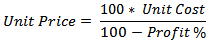
- Price=Cost+Profit: The value in the Unit Price field is calculated as follows:
- No relationship: Neither the Profit % field nor the Unit Price field are calculated.
Allow Invoice Disc.
Specify if the item should be included in the calculation of an invoice discount on documents where the item is traded.
For more information, see How to: Set Up Invoice Discount Terms.
Item Disc. Group
Specify an item group code that can be used as a criteria to grant a discount when the item is sold to a certain customer.
For more information, see How to: Create Sales Line Discounts for a Customer.
- Profit=Price-Cost: The value in the Profit % field is calculated as follows:
The Quantity on Hand field specifies the item’s current inventory as the sum of items on stock plus items on purchase orders. Choose the field to view the history of negative and positive transactions that make up the inventory.
In the Blocked field, specify if transactions with the item should be blocked, for example, because the item is in quarantine.
The Last Date Modified field specifies when information was last changed on the item card.
If you want to use this item card as a template when you create new item cards, then proceed to save it as an item template.
On the Home tab, in the Manage group, choose Save as Template. The Item Template window opens showing the item card as a template.
In the Template Name field, enter a descriptive name for the type of items that can be created by using this template.
To reuse dimensions in templates, on the Home tab, in the Master Data group, choose Dimensions. The Dimensions Template List window opens showing any dimension codes that are set up for the item.
Edit or enter dimension codes that will apply to new item cards created by using the template.
When you have completed the new item template, choose the Close button.
The item template is added to the list of item templates, so that you can use it to create new item cards as described in steps 2 through 5.
The item is now registered, and the item card is ready to be used on business documents where you trade with the item. For more information, see How to: Invoice a Sale.
 Tip Tip |
|---|
For more information about how to work with fields and columns, see Work with Data. For more information about how to find specific pages, see Search. |